Getting Started
Installing the CE Toolchain
Download the latest stable toolchain release below:
Windows: CEdev-Windows.zip
Linux: CEdev-Linux.tar.gz
macOS arm: CEdev-macOS-arm.dmg
macOS intel: CEdev-macOS-intel.dmg
If you would rather try the “nightly” build (which includes the latest features and bug fixes before an official release), you can find it here.
On Windows
Extract the zip to a folder without any spaces in the full path, e.g.
C:\CEdev.Double-click
cedev.batinside the extracted CEdev folder to launch the toolchain environment. You may have to allow the script to be run depending on User Account Control.If you want to avoid using the
cedev.batscript, you can extend the PATH environment variable to point to theCEdev/bindirectory. Here is a guide.
On Linux or macOS
Extract the archive to a path without any spaces, e.g.
/home/user/CEdev.Extend the PATH environment variable to point to
CEdev/binby modifying either the~/.zshrcor~/.bashrcin your home directory. An example command that can be added looks similar to the following:export PATH=/<insert path to the CEdev folder here>/CEdev/bin:$PATH
Caution
Only update your calculator’s OS to 5.4.0 or below. OS versions 5.5.0 and up remove the ability to natively execute C and assembly programs, which results in an Invalid Error when attempting to run programs. On these later OSes, use arTIfiCE to restore functionality.
Tip
The toolchain update process is the same as installation; the only extra step is to delete the current CEdev folder if it exists beforehand.
Example Programs
The toolchain includes multiple example projects inside the examples folder of your toolchain install (you can also take a look at them online on the git repo). Use these examples to learn how to write C/C++ code for the calculator.
The examples are broken out into:
- standalone_examples
These examples can be compiled directly using the manner described in Building Programs. They do not require any external dependencies.
- library_examples
These examples use the CE Libraries, a collection of functions and macros used to make things such as graphics, filesystem access, and keypad input faster and easier. They are used by many existing projects - the libraries themselves are downloadable here. The examples are further subdivided into the specific library they are demonstrating. For documentation on the available library functions, see the CE Libraries page.
Building Programs
This section describes the standard flow for building CE toolchain projects, starting with the classic “Hello World” example.
Open a build session by double-clicking cedev.bat on Windows or launching a terminal session on Linux/macOS.
Navigate to the examples folder using the cd examples command.
This folder contains example projects that you can build and modify to learn how to write different programs.
Navigate to the hello_world example project using the command cd hello_world.
Type make and press Enter.
This command invokes the compiler, assembler, and linker, creating the program bin/DEMO.8xp.
Use the CEmu emulator to run the built program, or transfer it to a real calculator using TI Connect CE.
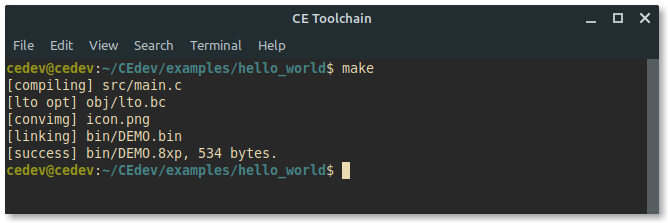
Building the Hello World example
Note
If on Windows you encounter errors such as Missing vcruntime140.dll, install the latest Microsoft Visual C++ Redistributable package.
The download can be found at this link; depending on the architecture, you will need to install either vc_redist.x86.exe or vc_redist.x64.exe.
Tip
Antivirus software (e.g. Windows Defender) may flag binaries in the CEdev/bin directory as false positives, and either quarantine/remove the files or prevent them from running.
Please whitelist or disable scanning in CEdev/bin to prevent these false positives from occurring.
Project Structure
Every CE Toolchain project has the following folder structure. It is highly recommended to keep the same structure to ensure that your project can build with future toolchain versions.
- src
This is the directory where all source files can be placed. Sources are built automatically if they end in a
.c/.cppextension, and can be edited with any text editor or IDE. Subdirectories are allowed as long as they do not contain spaces.- obj
Compiled C/C++ files are placed here, and contain intermediate assembly output.
- bin
This is where the final linked calculator program will be placed, ending with a
.8xpextension.- makefile
A text file used by
maketo build the program. There are options for setting the program name, description, and more.- icon.png
This is a 16x16 icon that is displayed in shells such as Cesium.
- README.md
A text file that describes the program’s operation.
- autotest.json
This file can be loaded into CEmu’s Autotester to test and validate the program. This feature may be useful for creating testable code and coverage.