Getting Started
Installing the CE Toolchain
Download the latest stable toolchain release for your OS by clicking here.
An additional “nightly” development build is available here, which includes the latest features and support before an official stable release.
On Windows
Extract the archive to a path without any spaces, e.g.
C:\CEdev.Double click
cedev.batinside the extracted folder to launch the toolchain environment. You may have to allow the script to be run depending on the user account control.If you want to avoid using the
cedev.batscript, you can extend the PATH environment variable to point to theCEdev/bindirectory. Here is a description.
On Linux or Mac
Extract the archive to a path without any spaces, e.g.
/home/user/CEdev.Extend the PATH environment variable to point to
CEdev/binby modifying .bashrc, .zshrc, or whatever flavor your OS uses. An example command may be:export PATH=/<insert path here>/CEdev/bin:$PATH
Note
The toolchain requires the installation folder and any project folders to not contain any spaces.
This is due to a limitation of the make command.
Building Programs
Programs are built with the make command, executed from a terminal session.
This tutorial explains how to use the CE Toolchain to build programs using make.
Locate the installed CEdev folder, and open a build session by double-clicking cedev.bat on Windows or launching your favorite terminal on Linux/macOS.
Navigate to the examples folder using the cd examples command.
This folder contains example projects that you can build and modify to learn how to write various programs.
Navigate the to the hello_world example inside this folder using the command cd hello_world.
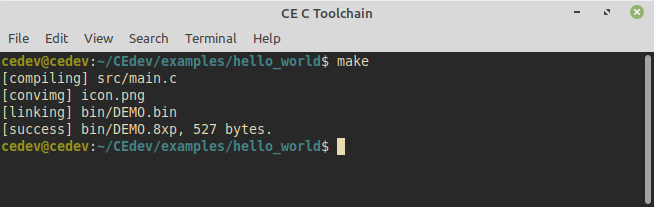
Type make and press enter.
This command invokes the compiler, assembler, and linker creating the file bin/DEMO.8xp.
The file stores the machine code of the program in a format fit for the calculator.
Note
On Windows, you may need to install the latest Microsoft Visual C++ Redistributable package if you encounter errors such as Missing vcruntime140.dll.
The download can be found at this link, depending on your computer you will need to install one of vc_redist.x86.exe, vc_redist.x64.exe, or vc_redist.arm64.exe.
Caution
On Windows, your antivirus software (e.g. Windows Defender) may flag binaries in the CEdev/bin directory as false positives, and either quarantine/remove the files or prevent them from running.
This may result in errors such as being unable find/run the fasmg program when building.
It is recommended you whitelist or disable scanning in CEdev/bin to prevent these false positives from occurring.
The CEmu emulator can be used to run the program, or you can transfer it to a real calculator using the cross-platform TI Connect CE.
Building the Hello World example
Each CE Toolchain project has the following folder structure:
src
This is the directory where all source files can be placed.
Sources are built automatically if they end in a
.c/.cppextension, and can be edited with any text editor or IDE.Subdirectories are allowed as long as they do not contain spaces.
obj
Compiled C/C++ files are placed here, and contain intermediate assembly output.
bin
This is where the final linked calculator program will be placed, ending with a
.8xpextension.
makefile
A text file used by
maketo build the program.There are options for setting the program name, description, and more.
icon.png
This is a 16x16 icon that is displayed in shells such as Cesium.
readme.md
A text file that describes the program’s operation.
autotest.json
This file can be loaded into CEmu’s Autotester to test and validate the program.
This feature is not required, but can be useful for creating testable code coverage.